A Stefani stainless steel benchtop water filter is a popular choice for households that want cleaner, better-tasting drinking water without committing to a full under-sink plumbing job. Because the unit sits directly on your kitchen counter, most people assume the installation process is identical for every model but that isn’t quite true.
Learning how to install a Stefani stainless steel benchtop water filter correctly starts with understanding which type you actually own. Stefani produces more than one style of benchtop unit: some are gravity-fed purifiers that require no plumbing connection at all, while others connect to your existing tap through a diverter or filtered-water spout. Before you unbox anything, it’s worth checking your model number, reading the instructions included in the box, and confirming which category your filter falls into.
This guide walks through the general installation concept for both styles, what to check beforehand, and how to confirm everything is working safely once it’s set up. Because exact fittings, tubing sizes, and cartridge types differ between Stefani models, always defer to the manual supplied with your specific unit for the final word on any step.
How Do You Install a Stefani Benchtop Water Filter?
In general, installing a Stefani benchtop water filter involves three possible paths depending on the model:
(1) assembling a gravity-fed unit and filling the top chamber so water filters down through the cartridge with no plumbing required,
(2) connecting the filter to your existing tap using a supplied diverter or adapter, or
(3) connecting inlet and outlet tubing to a tap-mounted filter spout using quick-connect fittings. Whichever type you have, the process typically includes preparing the filter and cartridge, making any required water connections, checking every joint for leaks, and flushing the cartridge before regular use. Model-specific steps should always be confirmed against your unit’s manual rather than assumed from another Stefani product.
What Is a Stefani Stainless Steel Benchtop Water Filter?
A benchtop water filter is a countertop filtration unit that treats water as it passes through, rather than being permanently plumbed into the wall or cabinet below your sink. It’s designed to be visible, accessible, and easy to move if you rearrange your kitchen.
Stefani’s stainless steel benchtop range covers a few different designs. Some are gravity-fed purifiers with two stainless steel chambers stacked on top of each other: you pour tap water into the upper chamber, and it slowly filters through a ceramic or carbon cartridge into the lower chamber, where a small tap dispenses the filtered water. Others are tap-connected units that draw water directly from your kitchen faucet through a diverter valve or a dedicated filtered-water spout mounted on the sink or benchtop.
The stainless steel housing itself is primarily about durability, hygiene, and appearance it doesn’t determine filtration performance. That comes down to the cartridge inside, which is designed to reduce contaminants such as chlorine, sediment, and taste-and-odour compounds. The exact contaminants addressed, and how effectively, depend entirely on the specific cartridge fitted to your model, so it’s worth checking your unit’s specification sheet rather than assuming performance is identical across the Stefani range.
What You Need Before Installing a Stefani Benchtop Water Filter
Before you start, gather what you’ll need. Some of these items are included with your filter; others may need to be sourced separately depending on your setup.
Usually included with the unit:
- Stefani benchtop filter housing (upper and lower chamber, or tap-mounted unit)
- The correct filter cartridge for your model
- Basic mounting hardware, washers, or a locking nut (for tap-connected models)
- A printed instruction sheet or manual
May need to be sourced separately:
- Additional tubing, if your model requires a longer run to reach the tap
- A compatible tap adapter or diverter valve, if not supplied
- Thread tape, if recommended in your manual
- An adjustable wrench or crescent tool, only if your manual specifies one
- A clean cloth or towel to protect your benchtop and check for leaks during setup
Don’t assume every accessory in this list applies to your unit; gravity-fed models generally need nothing beyond the filter itself and the cartridge, while tap-connected models rely more heavily on fittings and tubing. Check the parts list in your own manual before purchasing anything extra.
Check Your Stefani Filter Model Before Installation
Because Stefani sells several distinct benchtop designs, confirming your exact model before you begin will save time and prevent mistakes. Look for a model name or number on the base of the unit, on the box, or on the cartridge packaging, and take note of:
- Whether the unit is gravity-fed or tap-connected
- The filter cartridge type and size it uses
- The water inlet and outlet configuration, if applicable
- Tubing size and connector type, if your model uses tubing
- Tap or faucet compatibility, if it connects to your existing tap
- Any stated water pressure requirements
Stefani’s installation documentation for its wider filtration range including under-sink and tap-mounted systems sets out product-specific tubing sizes, quick-connect fittings, and connection requirements, which is exactly why a step written for one model shouldn’t be treated as universal across the whole range. If you can’t locate your model’s specific instructions, contact the retailer you purchased from or Stefani directly rather than guessing.
Step-by-Step: How to Install a Stefani Stainless Steel Benchtop Water Filter
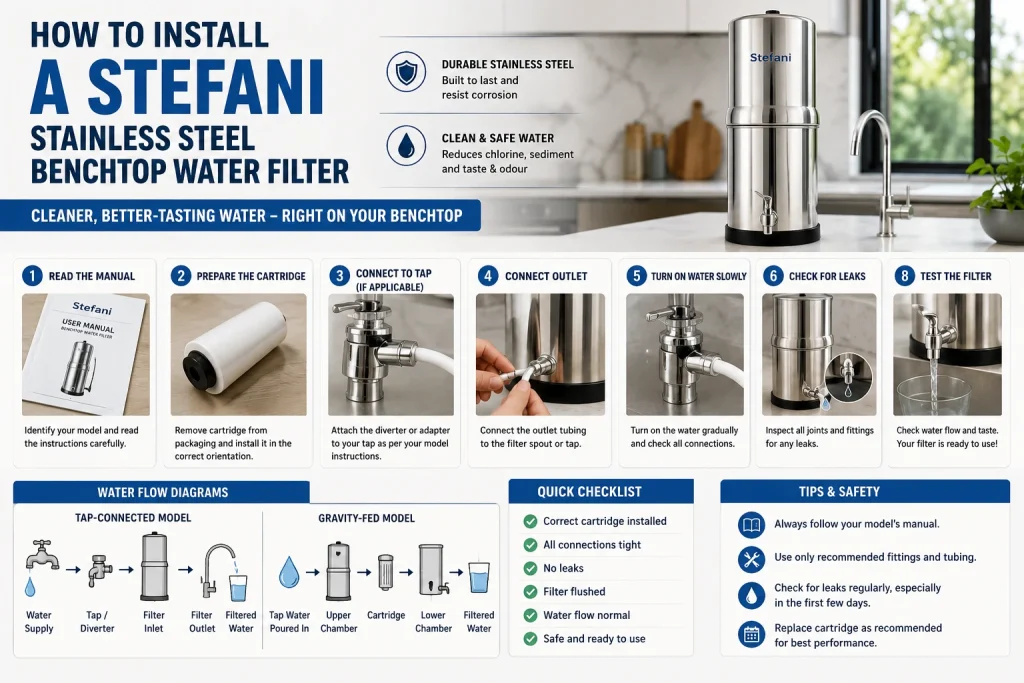
Step 1: Read the Manufacturer’s Instructions
Start by identifying your exact model and reading the manual that came with it in full. Confirm the correct cartridge is included or has been purchased separately, and check whether your model requires a tap connection or is fully gravity-fed. If your unit connects to a tap, note any stated pressure or fitting requirements before you continue. Never assume the steps from a different Stefani model apply to yours.
Step 2: Prepare the Installation Area
Choose a stable, flat section of benchtop away from the edge, since a top-heavy gravity unit can be knocked over if it’s placed too close to where people are working. Leave enough clearance for the lid to be lifted for refilling or cartridge changes, and if your model uses tubing, make sure the run avoids sharp bends and stays clear of foot traffic or cabinet doors. Keep all connections visible and reachable so you can check them easily later.
Step 3: Prepare the Filter Cartridge
Remove the cartridge from its packaging only when your instructions tell you to, since some cartridges are sealed to preserve freshness until installation. Inspect it for visible damage before fitting it, and install it in the orientation shown in your manual most cartridges only fit correctly one way. Avoid inventing your own soaking or rinsing routine; follow only what your specific manual recommends.
Step 4: Connect the Water Supply (If Applicable)
If you have a gravity-fed stainless steel benchtop purifier, this step is simple: there is no plumbing connection at all. You simply pour clean tap water into the upper chamber and let gravity carry it through the cartridge.
If you have a tap-connected model, this step involves fitting the supplied diverter, adapter, or filtered-water spout according to your manual. This may mean attaching washers to the tap thread, pushing a fitting into place, and securing it from below with a locking nut, or connecting inlet tubing to a quick-connect fitting. Don’t assume every Stefani benchtop filter uses the same connector some use a simple push-fit diverter, while others require a dedicated spout mounted through the sink or benchtop.
Step 5: Connect the Filter Outlet
For tap-connected models, connect the outlet tubing that carries filtered water to the dispensing tap according to your model’s instructions. If your unit uses quick-connect fittings, make a clean, square cut on the tubing and push it fully into the fitting, then gently pull back on the tubing to confirm it’s seated correctly. Avoid sharp bends or kinks along the tubing run, and double-check that you haven’t reversed the inlet and outlet connections before moving on.
Step 6: Turn on the Water Slowly
For tap-connected models, turn the water supply on gradually rather than all at once, and watch every connection point as pressure builds. For gravity-fed models, this step is replaced by simply pouring water into the top chamber and observing how it moves through the unit.
Step 7: Check for Leaks
Once water is flowing, check the following points carefully:
| Area to Check | What to Look For |
| Inlet connection | Dripping or seeping at the fitting |
| Outlet connection | Water pooling at the tubing joint |
| Filter housing | Moisture around the seams or lid |
| Cartridge area | Leaks where the cartridge seats |
| Tap or diverter connection | Water escaping around the base |
| Tubing joints | Any looseness or slow drips |
If you notice a persistent leak anywhere, stop using the system, turn off the water supply if applicable, and recheck the connection according to your manual. Stefani’s documentation for its filtration systems recommends checking every connection immediately after installation and continuing to monitor it over the following days, since a small leak isn’t always obvious right away.
Step 8: Flush the Filter
Most new filter cartridges need an initial flush to clear manufacturing residue and stabilise performance before the water is used for drinking. The exact flushing volume or time varies between Stefani cartridges, so check your manual for the specific recommendation rather than assuming a standard flush applies to your unit.
Step 9: Test the Filter
Once flushing is complete, check that water is flowing at a reasonable rate, that no leaks have developed, and that the filtered water looks clear. If your model is designed to address taste or odour, note whether the water tastes noticeably different from before. Give all connections one more visual check before considering the installation finished.
Stefani Benchtop Water Filter Installation Diagram
For a tap-connected model, the basic flow of water through the system looks like this:
Water Supply → Tap/Diverter → Filter Inlet → Filter Cartridge → Filter Outlet → Filtered Water
For a gravity-fed model, the flow is simpler:
Tap Water Poured In → Upper Chamber → Cartridge → Lower Chamber → Dispensing Tap
Because connection layouts differ between models, treat this as a general concept rather than an exact wiring diagram for your specific unit.
Common Installation Problems and Solutions
| Problem | Possible Cause | Solution |
| Water leak | Loose connection | Check and reseat the connection |
| Low water flow | Kinked tubing or a clogging cartridge | Inspect tubing and cartridge condition |
| No water flow | Incorrect or incomplete connection | Verify the inlet and outlet are correctly connected |
| Filter doesn’t fit | Wrong cartridge for the model | Confirm your exact model and cartridge type |
| Water taste remains | Insufficient flushing or a cartridge issue | Follow the manufacturer’s flushing instructions |
| Tubing disconnects | Quick-connect fitting not fully seated | Reseat the tubing with a clean, square cut |
| Filter housing leaks | Worn seal or O-ring | Inspect the seal according to your manual |
Troubleshooting details can vary between Stefani models, so if a problem persists after trying the general fix, check your specific manual or contact the retailer.
Common Mistakes to Avoid When Installing a Stefani Water Filter
- Using the wrong cartridge for your model
- Reversing the inlet and outlet connections
- Using fittings or tubing not recommended for your unit
- Cutting tubing at an angle instead of a clean, square cut
- Leaving tubing kinked or under tension
- Skipping the post-installation leak check
- Using the filter before flushing a new cartridge
- Over-tightening connections, which can crack fittings or damage seals
- Placing a gravity-fed unit too close to the edge of the benchtop
- Ignoring the manual in favour of general online instructions
How to Maintain a Stefani Stainless Steel Benchtop Water Filter
Ongoing maintenance keeps your filter performing as intended and extends its working life. This generally includes replacing the cartridge on the schedule recommended for your specific model, wiping down the stainless steel housing to keep it free of mineral buildup, and periodically checking tubing and fittings on tap-connected models for wear. It’s also worth keeping an eye on water flow and watching for any new leaks, especially after moving the unit or changing a cartridge. Cartridge life depends on factors such as household water quality, how much water passes through it, and the specific cartridge design, so treat any lifespan figure as a guide rather than a fixed rule.
When Should You Replace the Stefani Filter Cartridge?
Common signs that a cartridge needs replacing include a noticeable drop in water flow, a change in taste or odour that wasn’t present when the filter was new, visible damage to the cartridge, or simply reaching the replacement interval recommended in your manual. Stefani’s documentation notes that cartridge life can vary depending on the volume and quality of water passing through it, and that reduced flow or the return of taste and odour are practical indicators that a replacement is due rather than relying on a single universal lifespan figure across every model.
Stefani Benchtop Water Filter vs Other Countertop Filters
| Feature | Stefani Benchtop Filter | Other Countertop Filters |
| Installation | Model-dependent (gravity-fed or tap-connected) | Model-dependent |
| Space required | Countertop | Countertop |
| Cartridge replacement | Required, interval varies by model | Usually required |
| Plumbing work | None for gravity-fed models; minor for tap-connected models | Depends on model |
| Ongoing maintenance | Regular cartridge and seal checks | Regular maintenance typical |
| Filter options | Varies across the Stefani range | Varies by brand |
No single benchtop brand is universally superior the right choice depends on your household’s water quality concerns, available bench space, and whether you’d prefer a no-plumbing gravity unit or a tap-connected system.
Frequently Asked Questions
- How do you install a Stefani stainless steel benchtop water filter?
It depends on the model. Gravity-fed units simply need to be assembled and filled with water, with no plumbing required. Tap-connected units need a diverter or spout fitted to your existing tap, followed by a leak check and cartridge flush. Always follow your specific manual.
- Does a Stefani benchtop water filter need a plumber?
Most gravity-fed models don’t require any plumbing work at all. Tap-connected models are often designed for DIY installation, but if your setup involves drilling through a sink or benchtop, or you’re unsure about your home’s plumbing, professional help is a reasonable precaution.
- Where should I place a Stefani benchtop water filter?
Choose a stable, level surface away from the edge of the bench, with enough room above for the lid to open and enough access below for any tubing to run without kinking.
- How do I connect a Stefani filter to my tap?
This depends on your model’s supplied fittings some use a simple diverter that fits over the tap, while others use a dedicated spout mounted through the sink. Check your manual for the exact fitting type before starting.
- Which cartridge does my Stefani water filter use?
Cartridge type varies by model. Check the model number on your unit or its packaging, and match it against the cartridge listed in your manual or on the Stefani website.
- How do I know which way the water should flow?
Your manual will identify the inlet and outlet, usually marked on the housing or fittings themselves. Reversing them can prevent the filter from working correctly.
- How long should I flush a new Stefani filter?
Flushing time and volume vary by cartridge, so check your manual for the specific recommendation rather than assuming a standard flush applies.
- Why is my Stefani water filter leaking?
Leaks are usually caused by a loose connection, an incorrectly seated cartridge, or a worn seal. Turn off the water supply if applicable, recheck each connection point, and consult your manual if the leak continues.
- Why is the water flow slow after installation?
Slow flow can be caused by kinked tubing, a partially clogged cartridge, or a new cartridge that hasn’t been fully flushed yet. Check these areas before assuming there’s a fault with the unit.
- How often should a Stefani filter cartridge be replaced?
This depends on the model, your household’s water quality, and usage volume. Watch for reduced flow or a return of taste and odour as practical signs it’s time to replace the cartridge, and follow the interval recommended in your manual as a general guide.
Conclusion
Installing a Stefani stainless steel benchtop water filter comes down to a few consistent principles, even though the exact steps vary by model: identify your specific unit, prepare the correct cartridge, make any required water connections carefully, and check every joint for leaks before relying on the system for drinking water. Flush a new cartridge according to your manual, and keep an eye on flow and taste over the following weeks to confirm everything is working as expected. When in doubt about fittings, tubing, or pressure requirements, your model’s manual is the most reliable source and for anything involving permanent plumbing modifications, a qualified plumber is a sensible option.
Looking for reliable stainless steel water filtration solutions? Explore Xintan Filter’s stainless steel filters and custom filtration components designed for different water filtration applications.